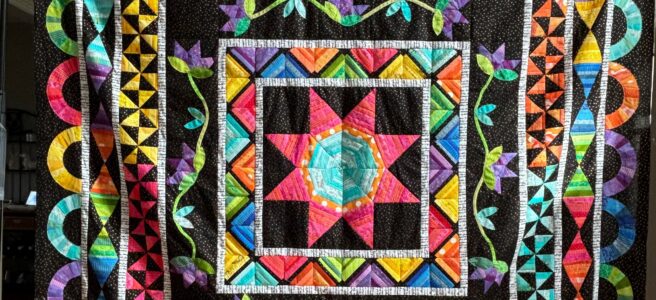
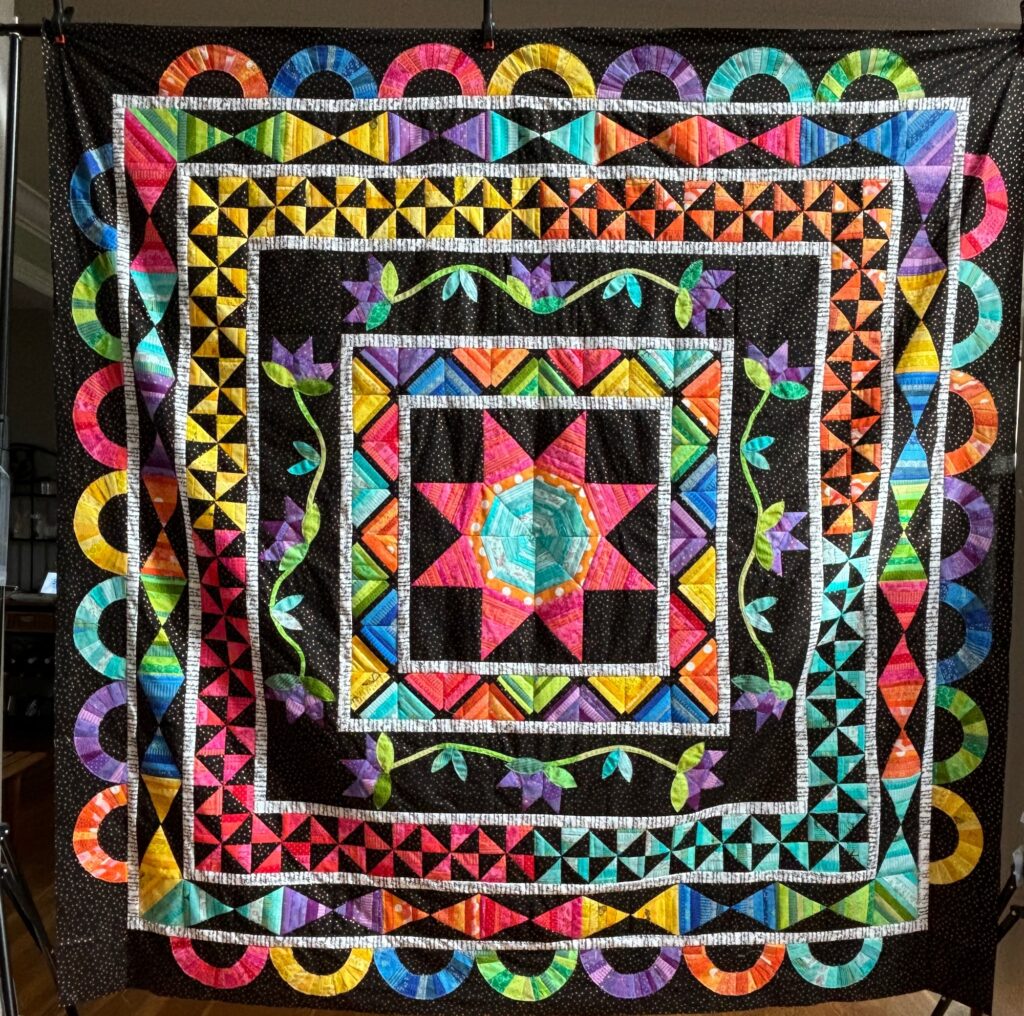
Oh my god, y’all. Have you seen the newest block of the month (BOM) program from Gotham Quilts? String Fling by Rana Heredia of Sewn Wyoming is so awesome. Between this fun pattern and Andrea’s fabric selection skills, I’m infatuated. I’m going to share some of the ups and downs of making this quilt, on a tight timeline.
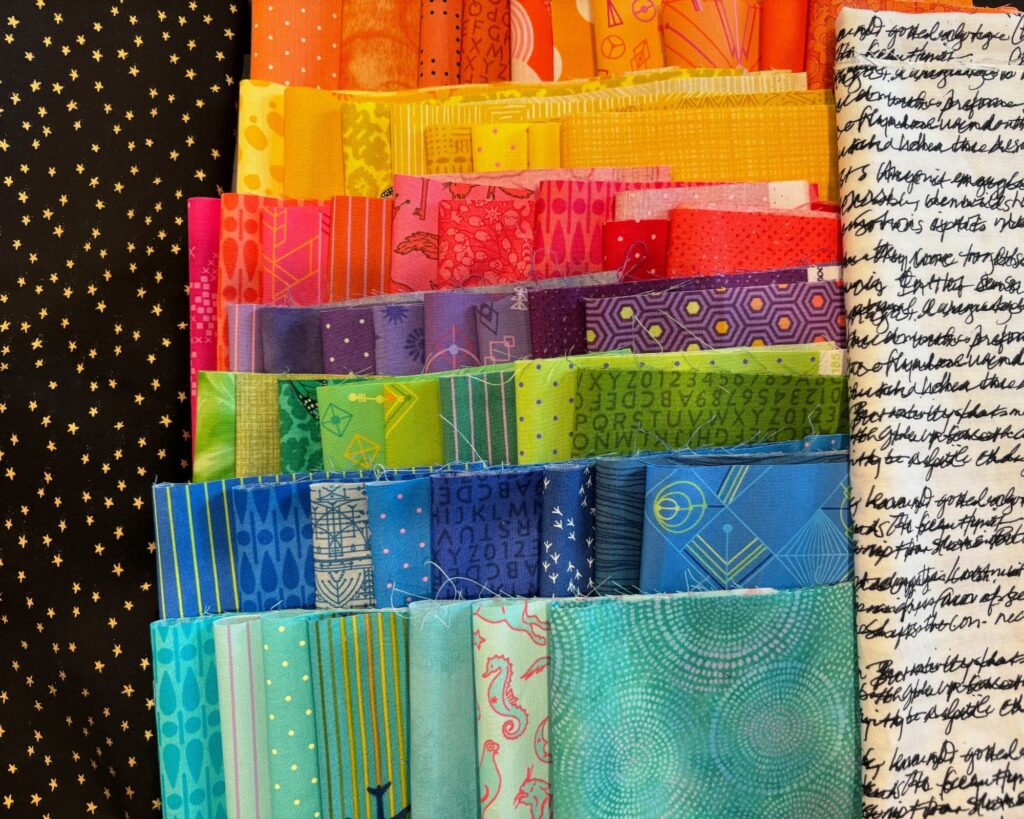
This quilt is a scrappy one – the pattern calls for something like 35-40 different fabrics, in groupings of 7 colors, plus a background and border. All of the fabrics, except the border and background are fat eighths, though, so it isn’t really that much fabric. Just a wide variety. Scrappy quilts are my favorites, so I love it. I was a little bummed that I couldn’t add from my stash – that isn’t allowed when you are making a shop sample. (Working at a quilt shop is fun, but there are downsides if you have a deep stash and love to play in it.)
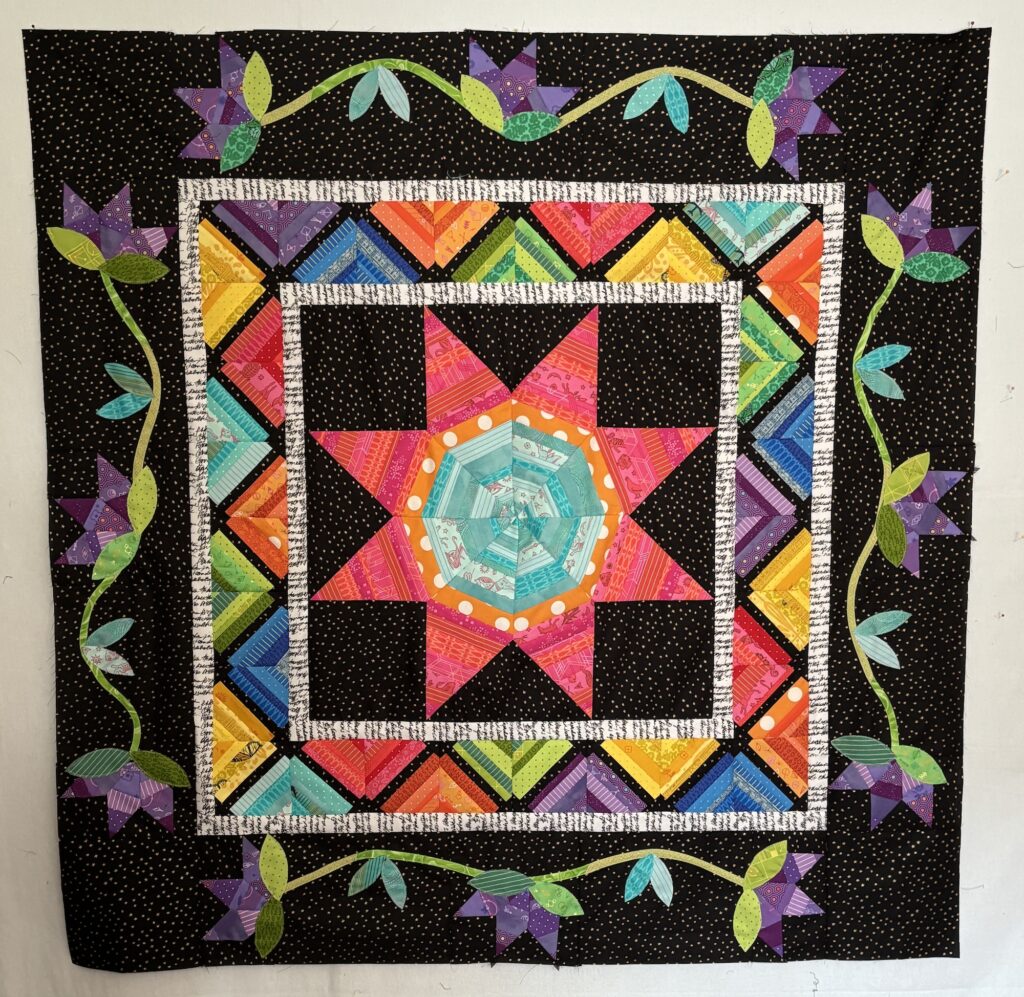
String Fling is a medallion layout – pretty standard for a block of the month. The only downside is that it starts out with a bang – string pieced units formed into an 8 pointed star, with y-seams. This can be really intimidating, but I enjoy challenges. We are planning out educational content to support the quilt, so it shouldn’t be too bad, even if a beginner were to join. Obviously we want to sell fabric, but my personal goal is to make sure folks have fun making their quilts.
There are only 6 months for the quilt, but since each month features a string piecing component, I’m suggesting that people give themselves 12 months to complete the project. One month for string piecing, then one month for block/border assembly. Our lessons will be recorded, and they will stay up for at least a year, probably longer.
I started assembling the quilt on July 2, with a goal of completed quilt by July 15. To add to the complication, Jeremy and I were in Florida, and he was on vacation. When Jeremy is on vacation, I’m on vacation too, because he goes from being a homebody to being a Man of Action. My Man of Action takes me diving, beaching, golfing, and for 11 mile bike rides. No matter how badly I want to work after that, I’m done.
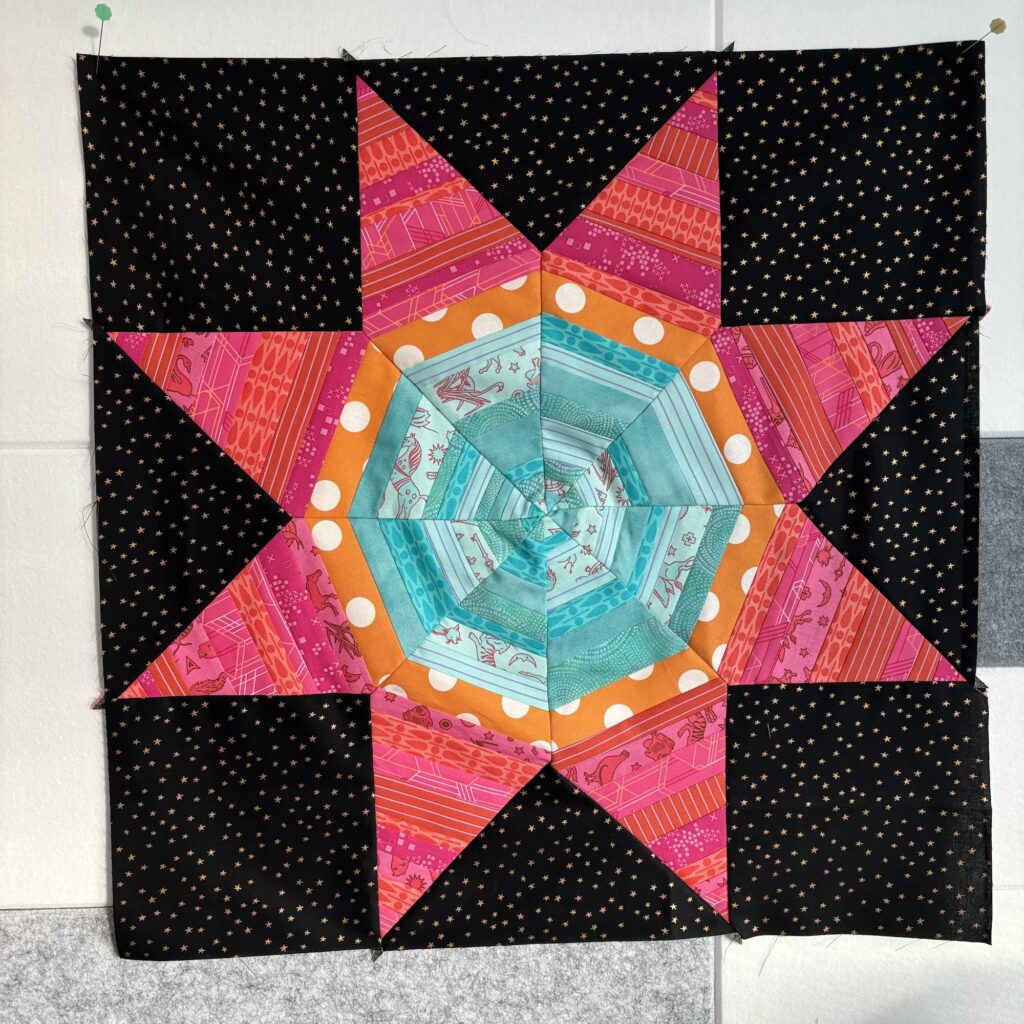
Here is block one. Not too bad, although it’s been a while since I’ve made these. I had a bit of a d-cup going. (I’m super lazy about tracing templates and did not do a good job.) I fooled with it a bit until I got it flat enough to quilt out. Luckily I’m an old pro with the longarm and spray starch. I know all the tricks, and I’m excited to share them in our videos.

I spent a while thinking about whether the borders (black and white print from Ravel by e Bond) should be cut according to the instructions, or if I should cut it so that the text was chopped up. I love the print as a border, but I didn’t want it to look like illegible text. But, I decided to follow the instructions.
Andrea did the piecing for month 2, so part of my fabric package included the entire pieced border. So nice! This one went on quickly. Of course, once it was assembled, Andrea pointed out that the border would look better cut the other way, so I took it apart, re-cut more fabric and re-attached it this way. Much better, and reminded me to ask when I have wondering.
Then I got to the third round, which was more y-seams. That slowed me down a bit, as did a bike ride. These little ones went together pretty nicely, better than the larger unit. Also, there is an appliqué component, which is perfect for covering up any imperfect points on the flowers. Of course, my fusible didn’t cooperate, so I had a bit of a hissy when it shredded some of my fabric. I then switched to just pinning the pieces down and stitching them in place. Yes, there is more fraying this way, but 1. this is a shop sample needed for photos only, and 2. I hate all fusibles and hope they burn in the fiery pits of hell. (I may, possibly, have some sensory issues.)
At this point we packed up and came back to New Jersey. I was honestly surprised that I hadn’t finished the entire top yet. At no point did my brain look at all of those pinwheels and v-blocks and say “that looks like a lot of work”. Nope. My brain said – “we know how to do that. It will take 15 minutes”.
You can see I went out of order. Andrea had string pieced the centers of the v-blocks, so for some reason I put the top row together. You know that story about having two wolves inside of you? I have two makers inside of me – one starts at A and goes in order, the other starts in a random spot. Unfortunately we both had a go at this project.
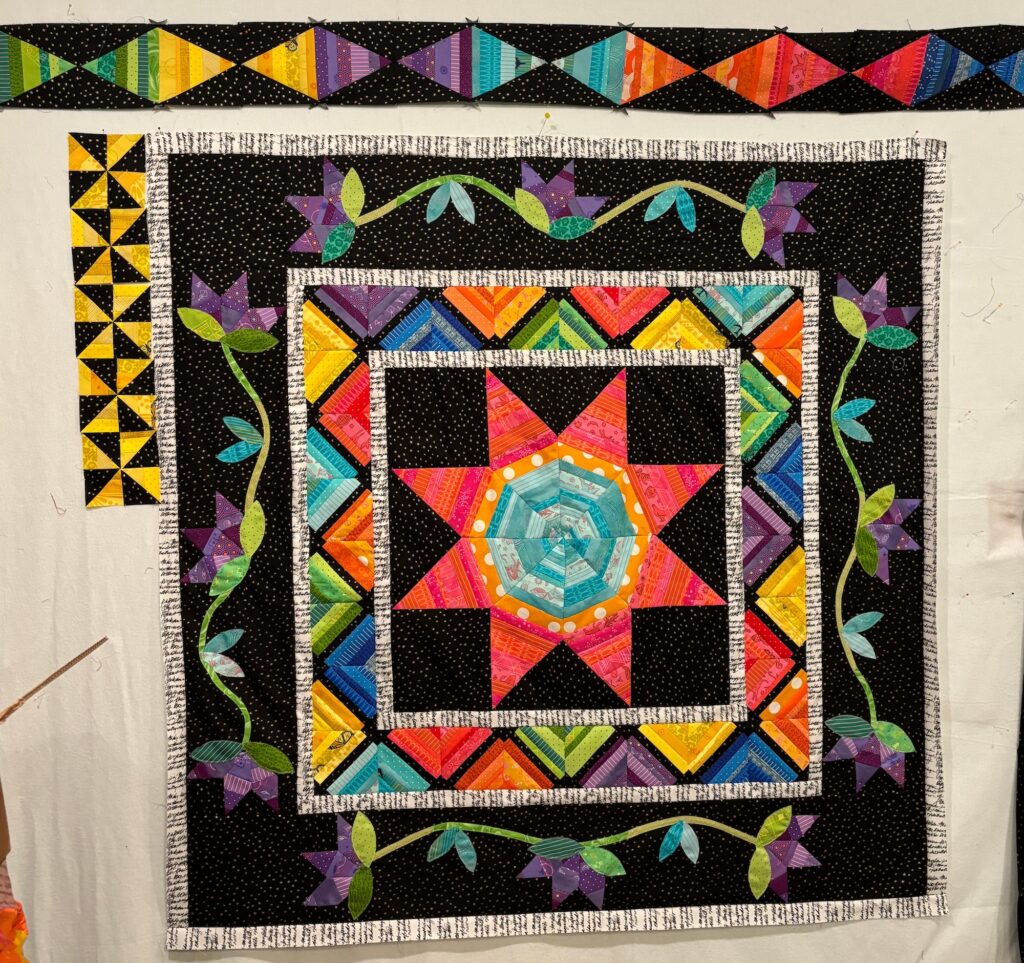
Once I started on the pinwheels, things slowed way, way down. First, it calls for string piecing onto a foundation. This is fun, but adds work I didn’t want to do on my timeline. So, I adjusted. I’ll offer this adjustment plan to BOM participants as an option. I string pieced a large panel, then cut the needed units. It was faster, although not fast by any means. Then we get to the fun part. I trimmed all of my first set of pinwheels to the wrong size. Smaller, of course. 6 hours of work, right into the toilet. I realized it at night, as I was gazing at the pieces on my design wall, wondering why the units didn’t reach to the middle of the quilt. Then I went to bed upset and didn’t sleep well.
The next two colors went on nicely. Then I made a large group of green blocks, instead of the aqua color they were supposed to be. Sigh. At least I realized before I had finished all of them. That only wasted 3 hours.
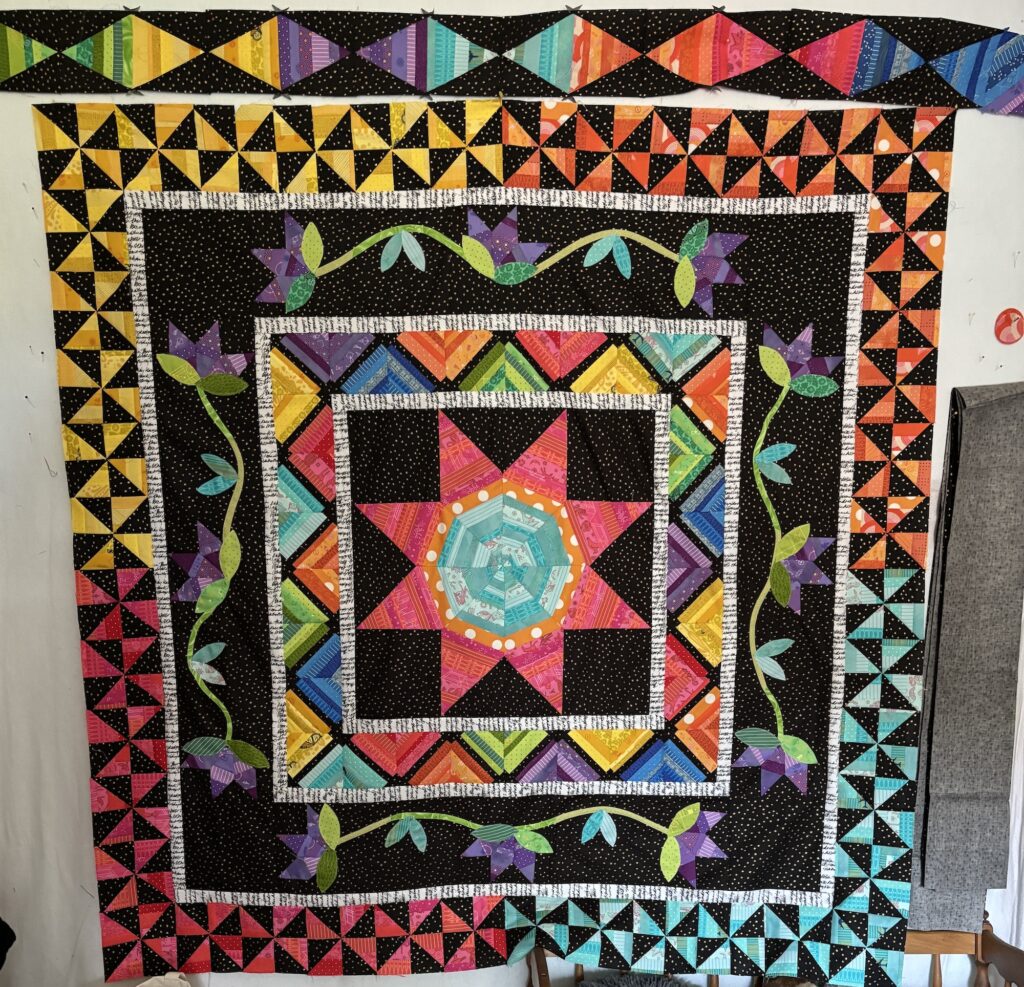
Finally, I was on to the V-block round, and one of the rows was already assembled! V-blocks are not my strongest block – I struggle with where to line up the triangles when assembling the block. After a few, I remembered and they went together pretty quickly. I thought the hardest part was going to be making sure I got all of the colors into the right spots. That was a challenge, but the bigger issue came when I pinned the border up on the wall. Each border was 4″ too long. WTF. On a long pieced border like this I would accept a 1″ discrepancy. That means my piecing isn’t as accurate as needed. 4″ isn’t me. I went over the math in the pattern and found an error. I called Andrea, mostly hysterically spouting math at her, and she calmed me down and looked at the math herself. She found two errors. We came up with a plan to fix the sample, and another plan to fix the pattern for our students. (This, my friends, is why pattern testers are a thing.)
Of course, that math error made me freak out, expecting the last border to be wrong. I spent a lot of stitching and pressing time agonizing over that, only to discover that the last round was correct! Woohoo! It still took a while – 28 scrappy arcs, pieced onto foundation, trimmed, paper removed, then appliquéd down. And no fusible, because I’m a little high strung and threw it all out in a rage. Just kidding – it’s on my shelf, but I’m not using it. It’s just there to make Mom angry when she wants some.
So, this project was expected to take 2 weeks, but took 3 instead. It stressed me out. Mostly because I am a skilled quilter, but not at all skilled at estimating how long something will take, or accepting that I have a life outside of my studio. Also, even when I read through the pattern initially, it didn’t seem that complicated. I am not a good pattern tester, and I’m terrible at reading patterns.
It’s on my sewing machine now, getting bound. I’m so excited to be able to take some finished quilt photos, lifestyle shots, a slo-mo quilt drop, and any other fun stuff Oscar and I can think of. It’s just so pretty!
I’m really looking forward to the BOM starting, and helping guide our students through it. I think it would be a ton of fun, if done over 6 or even 12 months, instead of 3 weeks. Plus, no one will be making the same mistakes I made. And, even if you do put colors in the “wrong” place, it doesn’t matter. Mine has to be accurate to the pattern, but students can play.
Want more details on the Block of the Month? Head over to Gotham Quilts.
Oh, and I do want to clarify. This deadline was something I volunteered for. I believe Ivete and Andrea cautioned me that it was too complicated for my predicted speed. I’ll listen better next time. Maybe.
Sometimes pattern directions make me scream. Especially when I know there is an easier way to accomplish the same thing. Turned out beautifully. I hope you enjoyed those breaks from sewing and gave yourself a little vacation too.
I’ve had conversations with designers who teach techniques I don’t like. We all have such different points of view. That’s why I love trying as many things as possible – if I struggle with one approach, I know there are multiple ways to accomplish anything.
Your story is so refreshingly honest. I always enjoy hearing how a teacher approaches a project and this doesn’t disappoint. Can’t wait for the project to start.